
You’re designing a bathroom. Maybe it’s a quick remodel, maybe it’s a full master suite, maybe the client keeps texting you “make it look bigger”. Either way, you want one thing: a plan that actually works in real life.
Think of a bathroom like a small stage. If the actors (toilet, sink, shower) don’t have room to move, the show is awkward. If they have too much room, it wastes space that could be used for something else. Good bathroom design makes everyone comfortable and keeps things practical.
This guide is written for those who place fixtures and count clearances for a living. Let’s start with an average bathroom size!
To ensure every fixture is placed with precision, it is essential to understand the technical requirements of professional architectural drawings before you finalize the layout.
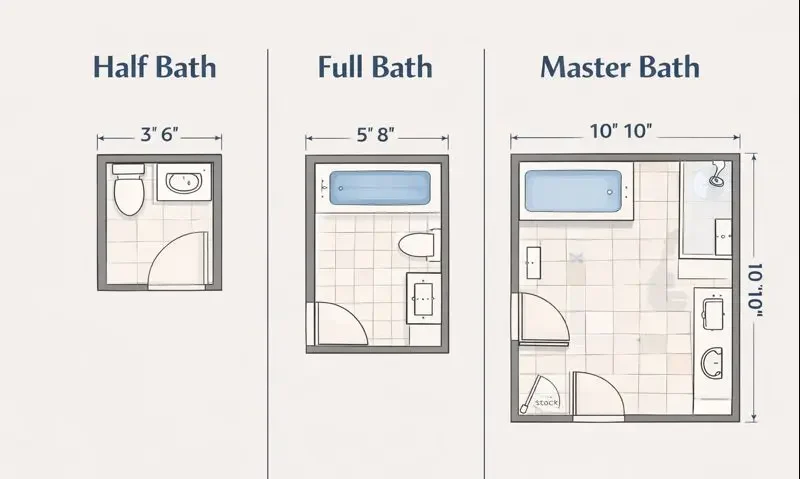
Standard & Average Bathroom Size
This varies, depending on where the bathroom is going to be constructed.
| Bathroom Type | Typical Size (sq ft) | Common Dimensions |
| Powder room / Half bath | 15–25 | 3′×6′ to 4′×6′ |
| Small full bath (3/4 or full) | 25–40 | 5′×7′ or 5′×8′ |
| Standard full bath | 40–60 | 5′×8′ to 6′×10′ |
| Master bath (standard) | 100–150 | 10′×10′ to 10′×12′ |
| Luxury master bath | 150–250+ | Custom layouts |
Whatever your target area is, remember to balance fixture needs, circulation, and budget. For this, you need to understand square feet.
What Square Feet Means?
Square feet tell us the area of the bathroom. Picture a square that’s 1 foot on each side. If a room is 5 feet by 8 feet, it’s 40 square feet, because 5 × 8 = 40. That’s how CAD drafters and builders measure area. For the best area management/dimensions, you must know what should be included in the specific type of bathroom.
Types of Bathrooms & Their Features
Below is a focused, usable set of data for each common bathroom type.
1. Half Bath/Powder Room
This normally consists of 1 toilet and 1 small sink, which can be wall-hung or a slim vanity. Guests commonly use this type of bath. Here’s a table for dimensional details:
| Item | Minimum | Recommended |
| Room footprint | 3′ × 6′ (18 sq ft) | 4′ × 6′ (24 sq ft) |
| Door clear opening | 24″ | 28″–32″ |
| Toilet footprint | 30″ deep × 20″ wide | block: 30″×20″ |
| Toilet clear in front | 21″ min | 30″ recommended |
| Sink (wall-hung) width | 12″–16″ | 16″–20″ |
| Sink clear in front | 24″ min | 30″ recommended |
| Door swing | Avoid inward swing into fixtures | Pocket or out-swing is often used |
2. Small Full Bathroom
This includes a shower or tub, toilet, and a single sink, and it is common in apartments and tight remodels.
| Item | Minimum | Recommended |
| Room footprint | 5′ × 7′ (35 sq ft) | 5′ × 8′ (40 sq ft) |
| Tub alcove | 60″ × 30″ | – |
| Shower pan | 30″ × 30″ min | 36″ × 36″ recommended |
| Vanity width | 24″ min | 24″–36″ |
| Toilet clear in front | 21″ min | 30″ recommended |
| Aisle between fixtures | 32″ min | 36″ preferred |
| Door clear opening | 28″ | 32″ recommended |
3. Standard Full Bathroom
This type of bathroom includes a tub or shower, toilet, single or double vanity, and storage.
| Item | Minimum | Recommended |
| Room footprint | 6′ × 8′ (48 sq ft) | 6′ × 9′ to 8′ × 10′ (54–80 sq ft) |
| Shower | 36″ × 36″ min | 36″ × 48″ or larger |
| Double vanity | – | 60″–72″ width |
| Toilet clearance | 30″ × 48″ preferred | Show 30″ clear in front, 15″–18″ from center to side wall |
| Linen/storage | 12″–18″ depth shelving | Built-in niches are recommended near the shower |
4. Master Bathroom
The master bathroom contains a double vanity, a large shower (sometimes steam or bench), a freestanding or alcove tub, a water closet, and storage/bench.
| Item | Minimum | Recommended |
| Room footprint | 10′ × 10′ (100 sq ft) | 10′ × 12′ (120 sq ft) or 12′ × 14′ |
| Double vanity | 60″ min | 60″–72″ or wider |
| Freestanding tub footprint | 66″ × 32″ typical | Reserve 30″–36″ clearance around tub |
| Large shower | 48″ × 36″ min | 60″ × 36″ or larger (walk-in/bench) |
| Water closet (optional room) | 3′ × 5′ min | 36″ × 60″ recommended for comfort |
| Circulation corridor | 36″ min | 42″ preferred in primary paths |
5. Accessible/ADA-Capable Bathroom
These are planning numbers for accessible layouts; always verify jurisdictional codes and the latest ADA/IBC text for compliance.
| Element | Required | Notes |
| Turning space | 60″ diameter circle or T-shaped equivalent | – |
| Toilet centerline | 16″–18″ from side wall (depending on spec) | Clearances: 30″ × 48″ approach recommended. |
| Grab bars | 36″–42″ lengths, mounted per ADA heights | Note blocking behind the wall and elevations. |
| Lavatory | 30″ wide min clear approach; knee space 27″ high min | Top height 34″ max for accessible lav. |
| Shower (roll-in) | 60″ × 30″ min OR 36″ × 36″ with transfer seat depending on layout | – |
| Door clear opening | 32″ min clear | – |
How to Measure the Bathroom Area?
1. Start with the program: ask the right questions
Before you draw a single line, know what the room is for. Ask your client:
• Who will use it: kids, adults, people with limited mobility?
• What fixtures do they want: tub, shower, double vanity, water closet?
• Do they need storage, seating, a bench, or laundry?
• Any site constraints, like existing stack, window, or studs?
• Accessibility requirements, including ADA and aging-in-place?
Write answers in one-line bullets. This will shape the footprint and clearances.
2. Pick a Footprint Range
Use a simple size band first; don’t over-detail. You can use this table for this purpose.
| Bathroom Type | Typical Dimensions | Approx. Area (sq ft) | Planning Notes |
| Half bath | 3′×6′ to 4′×6′ | 15–24 | Toilet and a small sink only |
| Small full bath | 5′×7′ to 5′×8′ | 35–40 | Tub or shower, toilet, single vanity |
| Comfortable full bath | 6′×8′ or 6′×9′ | 48–54 | Better clearances and storage |
| Master bath | 10′×10′ to 10′×12′ | 100–120 | Double vanity, separate tub and shower |
| Accessible bath | Varies | Varies | Must allow 60″ turning radius or T-turn clearance |
Pro Tip: Choose the smallest band that meets the program’s needs. You can refine after placing fixtures.
3. Drop in Fixture/Hardware Footprints
Place the actual items next. Use these footprints as your blocks. Below is the table for better understanding.
| Fixture | Typical block (W × D) |
| Toilet (floor-mtd) | 30″ × 20″ |
| Wall-hung toilet | 30″ × 18″ |
| Single vanity | 24″–36″ × 21″ |
| Double vanity | 60″–72″ × 21″ |
| Alcove tub | 60″ × 30″ |
| Freestanding tub | 66″ × 32″ |
| Shower (min) | 30″ × 30″ |
| Shower (recommended) | 36″ × 36″ |
| Shower (comfort/walk-in) | 36″ × 48″+ |
Pro Tip: Place fixtures against likely wet walls first, which simplifies piping and lets you see circulation.
4. Dimension the Clearances
Clearances are the real rule-makers. Dimension them as usable space, and not just fixture outlines.
| Feature / Fixture | Minimum Clearance | Recommended Clearance |
| Toilet (front) | 21″ | 30″ |
| Toilet (side) | 15″ | 18″ |
| Sink / Front | 24″ | 30–36″ |
| Aisles between fixtures | 32″ | 36″ |
| Shower (internal) | 30″×30″ | 36″×36″ |
| Door clear opening | 24″ | 32″ |
5. Check Door Swings & Circulation Paths
Doors break designs. Therefore, it is essential to resolve swing conflicts early. Here are the rules and what to ensure during checking door swings and the circulation path.
- Show the door swing on the plan.
- If the inward swing hits fixtures, use pocket or out-swing (call pocket framing).
- Keep a 36″ clear corridor through main routes where possible.
- For master suites, ensure dual circulation so two people shouldn’t collide at the vanity.
6. Consider the Plumbing Stack & Venting
Plumbing stacks and venting are where budget and feasibility collide. Therefore, treat them first: whenever there’s an existing stack, place toilets and showers as close to it as you can. Moving fixtures away adds real plumbing cost, and you should flag that to the client early.
On the schematic, show approximate pipe-run distances so everyone understands the scope of new piping; on the plan, clearly label the stack and call out rough-in dimensions (for example, note the toilet trap center at 12″ from the finished wall).
If you’re specifying non-standard fixtures, add the manufacturer’s rough-in information on the drawing so installers know exact offsets and heights. In short, stack first, dimension clearly, and note any deviations or extra runs so the budget and the build don’t surprise anyone.
7. Add Accessibility Options if Required
If the room needs to be ADA-capable, treat accessibility like the plan’s backbone:
- Reserve a 60-inch turning circle or draw the equivalent T-turn on the floor plan so a mobility device can actually maneuver
- Set the toilet centerline 16–18″ from the side wall
- Dimension the lavatory with a minimum 27″ knee clearance and a maximum top height of 34″
- Specify a 32″ clear door and then draw and dimension 30″×48″ approach zones at each fixture so those clearances are unmissable on the contractor’s set.
- Call out solid blocking for grab bars on the plan and again in the elevations, showing offsets and heights, so nobody has to tear tile to add support later.
8. Detail Functional Heights & Blocking
To make the drawings actually buildable, every critical height and attachment point should be called out clearly.
- Specify vanity height, usually 32–36″.
- Indicate the mirror’s bottom or midpoint, referencing the typical eye level.
- Note toilet seat height, 15″ standard or 17″ for comfort, and show grab bar mounting heights, including solid blocking behind the tile with exact offsets.
- Don’t forget accessory heights like towel bars and toilet paper holders.
Put all of these dimensions into an elevation schedule table so installers and contractors can reference everything in one place without guessing, ensuring the design is both precise and practical to build.
Managing these technical layouts requires a deep understanding of core systems; for more details on coordinating these utilities, refer to our guide on what does MEP mean in construction.
9. Resolve Finishes & Tolerances
Finishes change how things actually fit, so lock them in early. Tile thickness (large-format vs. mosaic) will shift threshold heights and door clearances; shower curb height affects headroom and what door hardware will work; and a stone countertop overhang can eat into clearance near doors and adjacent circulation.
Furthermore, call out finish build-ups on the plan, update thresholds and clearances in the detail sections, and include this note on the drawing: “Finish thicknesses included and verify with finish schedule before final dimensioning.
10. Draw the Details, Including Slope, Thresholds, & Risers
Don’t leave build-critical items to memory. The following are some minimum details you must show:
- Shower slope (¼″ per foot typical to drain).
- Shower threshold height and type (curb vs curbless).
- Linear or point drain location.
- Plumbing riser schematic: hot/cold runs, vent, stack.
- Blocking locations and elevations.
Also, include one section through the shower showing slope and membrane.
11. Work On Deliverables
Before issuing, ensure the set includes:
- Dimensioned floor plan with clearances.
- Reflected ceiling plan (lights, fans).
- Elevations for vanity, shower, and water closet.
- Plumbing riser and rough-in notes.
- Detail sheets: curb, gate, tile pattern, blocking.
- Fixture schedule with rough-in sizes and manufacturers.
- Layer legend and block attribute table.
Pro Tip: Put a verify local code note on the title block.
While standard sets include 2D plans, many clients now prefer a 3D Floor Plan Rendering to better visualize the spatial flow and finish details of their bathroom design.
12. Pass the Final Review Checklist
Tick these off:
- Program confirmed with client.
- Footprint selected and fixtures placed.
- Clearances dimensioned and labeled.
- Door swings resolved.
- Stack and riser coordination noted.
- Accessibility requirements handled (if applicable).
- Finish thicknesses noted.
- Details for the shower and blocking are included.
- Deliverables checklist complete.
To accurately represent shower slopes and membrane layers, ensure you include a high-quality section drawing that provides a vertical cut-through of your bathroom’s structural details.

Common Mistakes to Avoid During Bathroom Sizing
● Drawing Fixtures Only, & Not Clearances
Some people drop in a toilet, sink, and shower, then call it a day. But if you don’t dimension the space around them, people can’t move comfortably.
Example: You place a 30″×20″ toilet in a 5′×7′ room but ignore the 30″ clearance in front. When someone sits down, their knees hit the vanity, and there’s barely room to stand up. The contractor ends up making costly adjustments, or the user ends up with a cramped, frustrating bathroom.
● Ignoring the Door Swing
Doors are tiny but sneaky. If you don’t show how they open, you might end up with collisions.
Example: A pocket door could solve a problem, but you assumed a standard inward-swing door. When installed, the door hits the toilet or blocks the sink, forcing a retrofit or a larger door swing, which adds labor and delays.
● Forgetting Blocking
Blocking is the solid wood behind walls that holds grab bars, towel bars, or handrails. If you skip this on the drawings, installers have to hack into tile or drywall to secure items safely.
Example: You design an ADA-ready bathroom without specifying grab bar blocking. After tiling, someone realizes there’s nothing to screw into. The wall has to be opened, and new blocking installed, which is messy, expensive, and frustrating for everyone.
● Not Checking the Stack Location
Plumbing stacks dictate where toilets, showers, and sinks can go. Ignoring them creates headaches and budget overruns.
Example: You design a 5′×8′ bathroom and place the toilet 6′ away from the existing stack. The plumber now has to extend the stack and vent lines, costing extra money, adding hours to labor, and possibly reducing ceiling height in adjacent rooms.
For a seamless build, ensure your plumbing stack placement is verified through professional MEP Drawing standards.
● Using Minimum Clearances when Comfort is Required
Minimum clearances might technically fit, but they feel crowded in real life.
Example: You plan a shower with a minimum 30″×30″ footprint because the code says it’s acceptable. In use, someone can’t raise their elbows without hitting the walls, or the door can’t fully open without bumping the towel rack. The bathroom works on paper but fails in experience, leading to complaints or retrofits.
In tight spaces, managing door swings is a critical skill; learn more about optimizing small layouts in our guide to tiny home dimensions to ensure every inch is functional.
How to Name Layers & Set Block Attributes in Drawings?
When you’re putting together bathroom drawings, good layer naming and block attributes aren’t just neat; they make your project easier. Think of layers like labeled shelves: everything has a home, and you can hide, lock, or isolate each type of object instantly.
With clean layers and attributes, you can:
- Quickly turn layers on/off for different views (plan vs. elevation).
- Filter or schedule all plumbing fixtures automatically.
- Avoid confusion during coordination with electrical, plumbing, and structural trades.
- Save hours during revisions, especially on complex projects.
Pro Tip: Keep the naming consistent across all bathroom drawings in your library. That way, every CAD user, from junior drafter to lead designer, knows exactly where to look.
Here is a table for your assistance.
| Layer Name | Description | Typical Blocks | Attributes |
| A-FIX | Plumbing fixtures | Toilet, sink, shower, tub | Attributes: NAME, W, D, HT, PLUMBING_REQ, BACKER_REQ |
| A-FURN | Furniture / non-plumbing items | Cabinets, benches, storage units | Include NAME, W, D, HT |
| A-DIMS | Dimensions | Room size, clearances, fixture offsets | No blocks; only linear/text dimensions |
| A-ANNO | Annotations | Callouts, notes, labels | Use text attributes for elevations, finishes, and instructions |
| A-DOOR | Doors and openings | Swing doors, pocket doors, sliding doors | Attribute: DOOR_TYPE, SWING_DIR, CLEAR_OPENING |
| A-ELEC | Electrical items | Lights, fans, switches, outlets | Attribute: NAME, HEIGHT, CIRCUIT |
| A-HATCH | Floor/wall hatches | Tile patterns, material fills, and wall finishes | Attribute: MATERIAL, SCALE, ORIENTATION |
Frequently Asked Questions
How much do CAD drafters charge?
It depends on the job. A small bathroom plan is quick, so it costs less. A big fancy bathroom with lots of details takes longer and costs more. Usually, it’s somewhere between $50 and $150 per hour, depending on how tricky the design is.
Do CAD drafters check old bathroom plans?
Yes! They look at old layouts to see where the pipes, walls, and doors already are. That way, they don’t accidentally put a toilet where the plumbing doesn’t reach. It saves time, money, and a lot of headaches.
How can I save money when designing a bathroom?
Keep things simple. Don’t move plumbing too far, pick standard-size sinks and tubs, and let the CAD drafters plan the space so people can move around easily. If it’s drawn right the first time, you won’t waste money fixing mistakes later.
How long does it take to finish a bathroom layout?
Small bathrooms are quick and take a few hours. Big bathrooms with lots of stuff, like a double sink, a big tub, or special accessibility features, take a few days.
Get Professional Assistance to Start Confidently!
To ensure perfect bathroom dimensions, CAD Drafters start by mapping fixture footprints, clearances, door swings, and plumbing stacks accurately. We factor in finishes, accessibility, and user comfort, then cross-check against codes. Every measurement is dimensioned, annotated, and layered for clarity, making bathrooms functional, buildable, and hassle-free for contractors.
Ready to get your bathroom designed right the first time? Let our expert CAD Drafters handle the dimensions, clearances, and details so your project flows smoothly from plan to build.